I've been having fun playing with nail art challenge prompts lately, but one that stumped me from the start was simply the color orange. Orange and yellow are just not my jam, and I have only a small amount of either specifically for nail art. Pondering that reminded me I'd picked up an orange crème polish late last year in case of Halloween needs, and a google images search
gave me plenty of ways to make orange more appealing to me.
 |
| bright afternoon sunlight |
For a first attempt after watching
this inspo video, which had a gorgeous look but no how-to pointers, I absolutely love how this came out.
 |
| indoor, bright CF lighting |
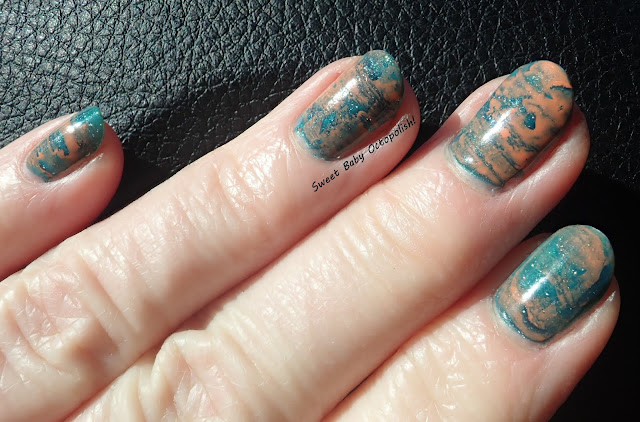
On my stamper head, I've dry brushed first in Flormar Coral Red, which is neither of those things, but instead a bright sunny orange crème. After that, there's a few swipes of Dance Legend Triumph, a dusty navy jelly with holo flake. Finally, I lightly covered the whole thing with one coat of a medium aqua shimmer polish.
 |
| bright afternoon sunlight |
Dry brushing tips: before starting, wipe off nearly all the polish back into the bottle. You want very little left on your brush, and watch out for more dripping down the brush stem as you work. You'll be swiping the brush over the stamper head repeatedly until the polish starts to dry, at which point the brush will start dragging the polish - on the nail, overworking polish with the brush until you get bald patches is a bad thing, but in this case the result is visually interesting patterns. I used 3 stamper heads here so that I could do one color at a time on each, allowing the first layer to dry before starting with the next color.
 |
| indoor, CF lighting |
To make this look pop, use your brightest accent color first, so that color ends up on top of the design. The 2nd layer should be darker or more color saturated, so that the marble stripes created with it can show through the pattern made by the top layer. Use fairly opaque polishes to do the top 2 layers - the jelly I picked for the middle layer was way too sheer, so the brushstrokes created by that one ended up very subtle. The final layer can be any opacity at all, but needs to be visually distinct so the colors don't blend into each other. I applied the marble off the stamper directly onto the nail after letting things dry for only 10 minutes or so - it was still plenty sticky at that point to not need any help to adhere to my nails.
 |
| outdoor, bright sunlight |
Have fun trying new things!
~Michelle


Interesting! I like the colours :-D
ReplyDelete