Last year, Dance Legend released a handful of colors in their Spot It line that were supposed to cause cool foamy bubbles when used as a topcoat over wet polish. Genius Russian bloggers were able to get spectacular results with this stuff (
seriously, watch the video because she makes it look suuuuper easy), but my one attempt on a swatch stick was a total fail. Flash forward to this year, when Sinful colors released their own version, and BOOM fluid nail art has really taken off.
 |
| outdoor, bright sunlight |
I made a swatch stick with Dance Legend Spot It White when I first got it, painting directly over a wet black base using a technique like what was in that Russian video. It ended up as a streaky white wash over the black base - no foamy look, no bubbles, dud. After the Sinful polishes blew this trend up, folks came up with several ways to get the "cells" to form in wet polish, so I revisited DL Spot It White, and got the super cool results you see above.
 |
| all the materials that went into this craziness - NB this is not going to be a quick mani |
First up, some people have gotten absolutely smashing results by pouring polishes onto a food container lid and then tilting the lid in all directions, causing the polishes to marble into each other.
 |
| the tilt-on-a-lid trial |
For the test patch above, I poured out a good quantity of Sinful Colors Peppered Amazon, then dropped in streaks of Don Deeva Mi Vieja Bella and blops of Spot It. The tilting resulted in some ok "cells" in a few places, but otherwise it all just started to blend together. The looping swirls all across the bottom were done with a dotting tool, and that helped in one spot and did nothing in the rest of it. Overall, this technique is supposed to yield one large sheet that you can peel off in a single piece, then cut into decals, choosing the areas with the best patterning. Hot tip: this was the lid to a plastic tub of field greens salad, and the polish stuck firmly when it dried. Not all lids are created equal, test your lid to make sure that you can peel off the dry polish later!
Since I literally poured out of the bottle and onto the lid, this used a crazy amount of polish (there was a very obvious fill line in the green bottle when I was done), and ended up not working for me at all. On to method 2, stampers!
 |
| check out the "cells" on these stampers! |
It seems that some magic amount of agitation is needed to activate the foaming effect of these polishes. Too much, and the Spot It just dissolves into the base polish. Not enough, and you get no "cells." Just right, though, happens when you smunch a dollop of polish with a stamper head.
 |
| the best result from this trial |
For this method, I dropped a few thick drips of my green base off the end of the brush onto my stamping mat until I had a dime-sized pool of polish to work with. Then I added 2 drops of wine, then 2 drops of white, and pressed my stamper head into the pool 1 or 2 medium-firm taps, enough to spread the pool out to quarter or 50-cent piece size. This squishing together seems to be about the perfect amount of agitation needed to get the polish to foam up, and the moment I pulled the stamper head off the mat it was easy to see the "cells" forming up nicely. Best of all, both the polish on the stamper head (above) and on the mat (below) worked out, so for every stamper run you get 2 decals to work with. I got a useable design on nearly all of the testers I made with this method, and it used significantly less polish than the tilt/drip marble method, so the decals dried faster.
 |
| ok, technically on the lid, so this one couldn't be used, but the foamy action worked just fine. |
I let these paint blobs dry for a good 5 minutes, then topcoated with Wet N Wild Clear Nail Protector (the best thing for making decals, since it dries soft and flexible instead of brittle) and let dry for 30 minutes. I was able to peel all of them up successfully from my mat and from the stamper heads, and many of the resulting decals were large enough to use for 2 nails. Some areas of foam development left the decals thin or even with holes in them, so to get them on the nail, I painted one thin layer of Peppered Amazon and stuck the decals onto that.
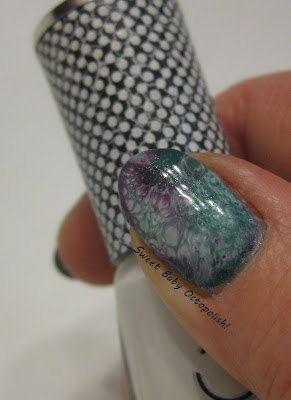
I was super pleased with how this ended up turning out in the end, and I'm showing you both hands here because somehow I ended up liking what I placed on my Cinderella hand best.
 |
| indoor, bright CF lighting for both |
The final look was absolutely reminiscent of ruby in zoisite, where small crystals of fuchsia ruby seed out in the middle of a swirly green marble matrix. Love it!
When I played around with swatch sticks and the 2 bottles of Sinful foaming topcoats I snagged, it seems that the Dance Legend Spot It makes much smaller "cells" than the Sinful does. This matches up to the
tiny bubbles in most Russian blogger pics of the DL collection.
Where to buy: Spot It is carried by
any of Dance Legend's stockists.
~Michelle


Comments
Post a Comment